
Having finished the fuselage the one thing that did remain to be completed was the installation of the seat and fitting of the padding around the cockpit rim.
Both of these tasks should have been straight forward, but were complicated by the age of the kit.
The seat in the kit is a lovely white styrene moulding and would build up into an impressively realistic copy. However, the back part of the seat is produced as a flat piece which needs to be warmed and formed into a curve to fit around the base and squab.
I duly dropped the seat back in some hot water (as hot as my delicate dannies could stand) and then offered it up to the seat squab and gently tried to ease it into position.
SNAP! – closely followed by a series of robust Anglo-Saxonisms.
I can only assume the plastic has become brittle with age as it snapped so easily. There was no way it would have ever bent to the required radius without partially melting it. The water I put it in must’ve been 60-70°C as it was.
Whatever, the thing was broken and even if I glued it back together it would still be brittle and wouldn’t ever form to an even curve. The break would always be a weak spot and discontinuity. After considering the problem over a few days I decided the only course of action was to make my own seat back from scratch using wire.
So, using the broken part as a template, I drew a pattern in CAD to work from. In order to hold everything in position while I got weaving, I made the vertical ‘canes’ over-length and soldered them into some square section tube as shown below.
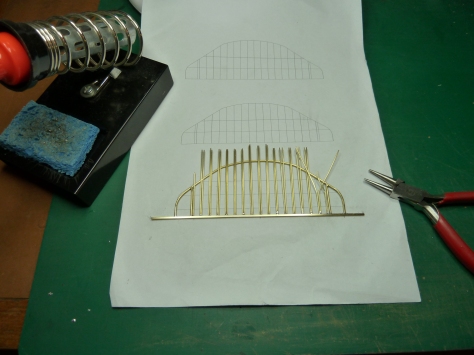
The risers were bent to shape against the pattern using round nosed pliers.

The whole assembly was then soldered up in its flat state.
As it would be difficult the bend the square bottom section evenly I unsoldered it (once the top piece was holding everything together) and replaced it with some annealed round wire. Then it was a simple case of bending the whole assembly around a former of the right size. A jar of pesto since you ask.
With the thing bent to shape I then got weaving. I’m no weaver so it was a bit ‘make it up as you go along’. I did find some useful pictures on the net of a replica seat being made for a Camel though, which were helpful.
Initially I tried using 0.6 mm soft copper wire for the weaving, but it was to stiff and getting even tension was hard. Soft lead wire was better but still not very satisfactory. So in the end I used 0.6 mm monofilament fishing line. The weaving itself was tedious. Very. But we got there in the end, and with only one mistake.
With the basic structure complete I cut the risers to length at the bottom losing the round holding wire in the process. This left me with…

Getting even tension was the hardest part of the operation, particularly on the top section.

The whole assembly was given a coat of primer prior to being painted a dark yellow/tan.

The seat base was painted to match and the squab cushion painted a medium brown.

When that was all dry the back was attached to the base, the padding strip around the top added and the leather parts detailed with artists oils. Burnt Siena again in this case. The wicker was also dry brushed with a very pale yellow to bring out the detail.

The overall effect looked pretty good, but I wish I’d got the tension of the weaving more even in the top section. It’s a bit ropey in places to be honest.
The final operation prior to fitting the seat in the cockpit was to make a lap strap. This is another obvious part missing from the kit. I used some of the left over Solartex to make the actual straps. The fittings were all made from brass wire.
When everything was dry I installed it in the cockpit.
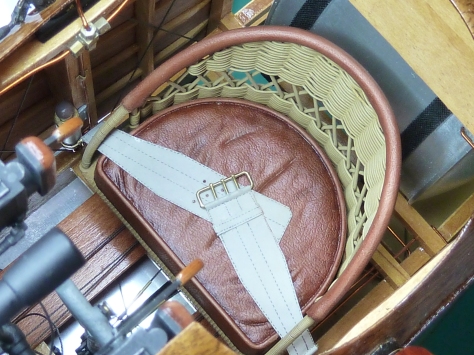
In retrospect I wish I’d detailed the lapstraps a bit more. They look flat and unconvincing against the seat itself. They are too deep in the model, and the risk of messing the seat up too high, to do it now.
The final part to add was the padding around the cockpit coaming. Like the top of the seat back this comes as a moulded rubber strip in the kit. Unlike the seat back, the rubber of the coaming had completely lost its flexibility. It was as stiff and brittle as bakalite and completely unusable, which is a shame as it was a nice moulding.
Enquires to Hasegawa revealed that no spares exist for any of the Museum Series models now so I was on my own. Luckily I also have the 1:8 scale Folker Dr.1 in this series and that has a similar moulding which hadn’t deteriorated.
I mounted this on the edge of a steel ruler and then used a silicone compound the take a moulding of it. Once everything had cured I removed the Fokker part and filled the mould with black RTV silicone sealant and pressed the ruler back into position.

After a few days on the radiator to make sure everything had cured properly and, hey presto, a replacement coaming.

A quick trim to neaten things up and then it was glued in place with CA glue. Here it is in the finished model.

All that was left was to put the whole model together which I’ll cover in the next, and final post.

This is unreal!
LikeLiked by 1 person
Extraordinary work. When I first saw the first picture I thought we were looking at a full scale museum piece.
Incredible work.
LikeLiked by 1 person
I’m really looking forward to the finished model and seeing all your incredible work combined into one single masterpiece.
LikeLiked by 1 person
I need to find somewhere to get some decent pictures of it. It’s not that easy as it has a 42″ wingspan which means I need to set it up outside really, and the weather’s not been conducive to that recently
LikeLiked by 1 person
No. You don’t want to finish it only to have some wind come long and ruin it!
LikeLike
We can wait…
LikeLike