
The blog has been quiet for the last couple of months, but not due to inactivity at MBIQ Mansions. I am in fact in the process of building a second Hasegawa 1:8 Camel F1, this time as a commission. I’ve been contemplating whether it was worth documenting the build as 90% of it is a straight repeat of my first build covered earlier. However, as I’ve progressed with the project I’ve been able to incorporate a number of changes and improvements that are absent in my first build, so I thought it might be useful to at least highlight some of them.The updates will therefore be more by exception than a detailed step-by-step discussion of what I have done.
First up was the assembly of the engine. The only real change here was the type of paints used. Having tried Humbrol’s Metalcote and Vallejo’s Model Air in the past (with mixed results) I decided to give Alclad 2 Lacquers a go, and I’m a convert. They airbrush extremely well and the finish is excellent. The copper and brass lacquers are the first that I’ve found that perform well with my 0.3mm Iwata HP-C Plus airbrush. The copper finish on the rockers is especially satisfying compared to the inlet pipes on my earlier Fokker DR.1’s engine.


The lacquers can’t be brush painted though, so the spark plugs on the engine were finished in Humbrol’s Brass.
I also took the opportunity this time around to upgrade the metal empennage parts. My original design used annealed brass throughout which, while easy to work, resulted in an overly delicate model. The brass rod in particular was apt to bend under the least impact. This time I substituted stainless steel for the brass rod sections which has improved the robustness considerably.
I also modified the hinge design to incorporate a small spacer which ensures there is an adequate gap between the two halves which has improved the operation of the final result.


It was interesting to see the propeller in this second kit. The finish on it wasn’t nearly as good as the one in the first, and it took quite a lot of sanding effort to get it to the same state. Likewise the surface hasn’t taken the mahogany stain quite so readily.


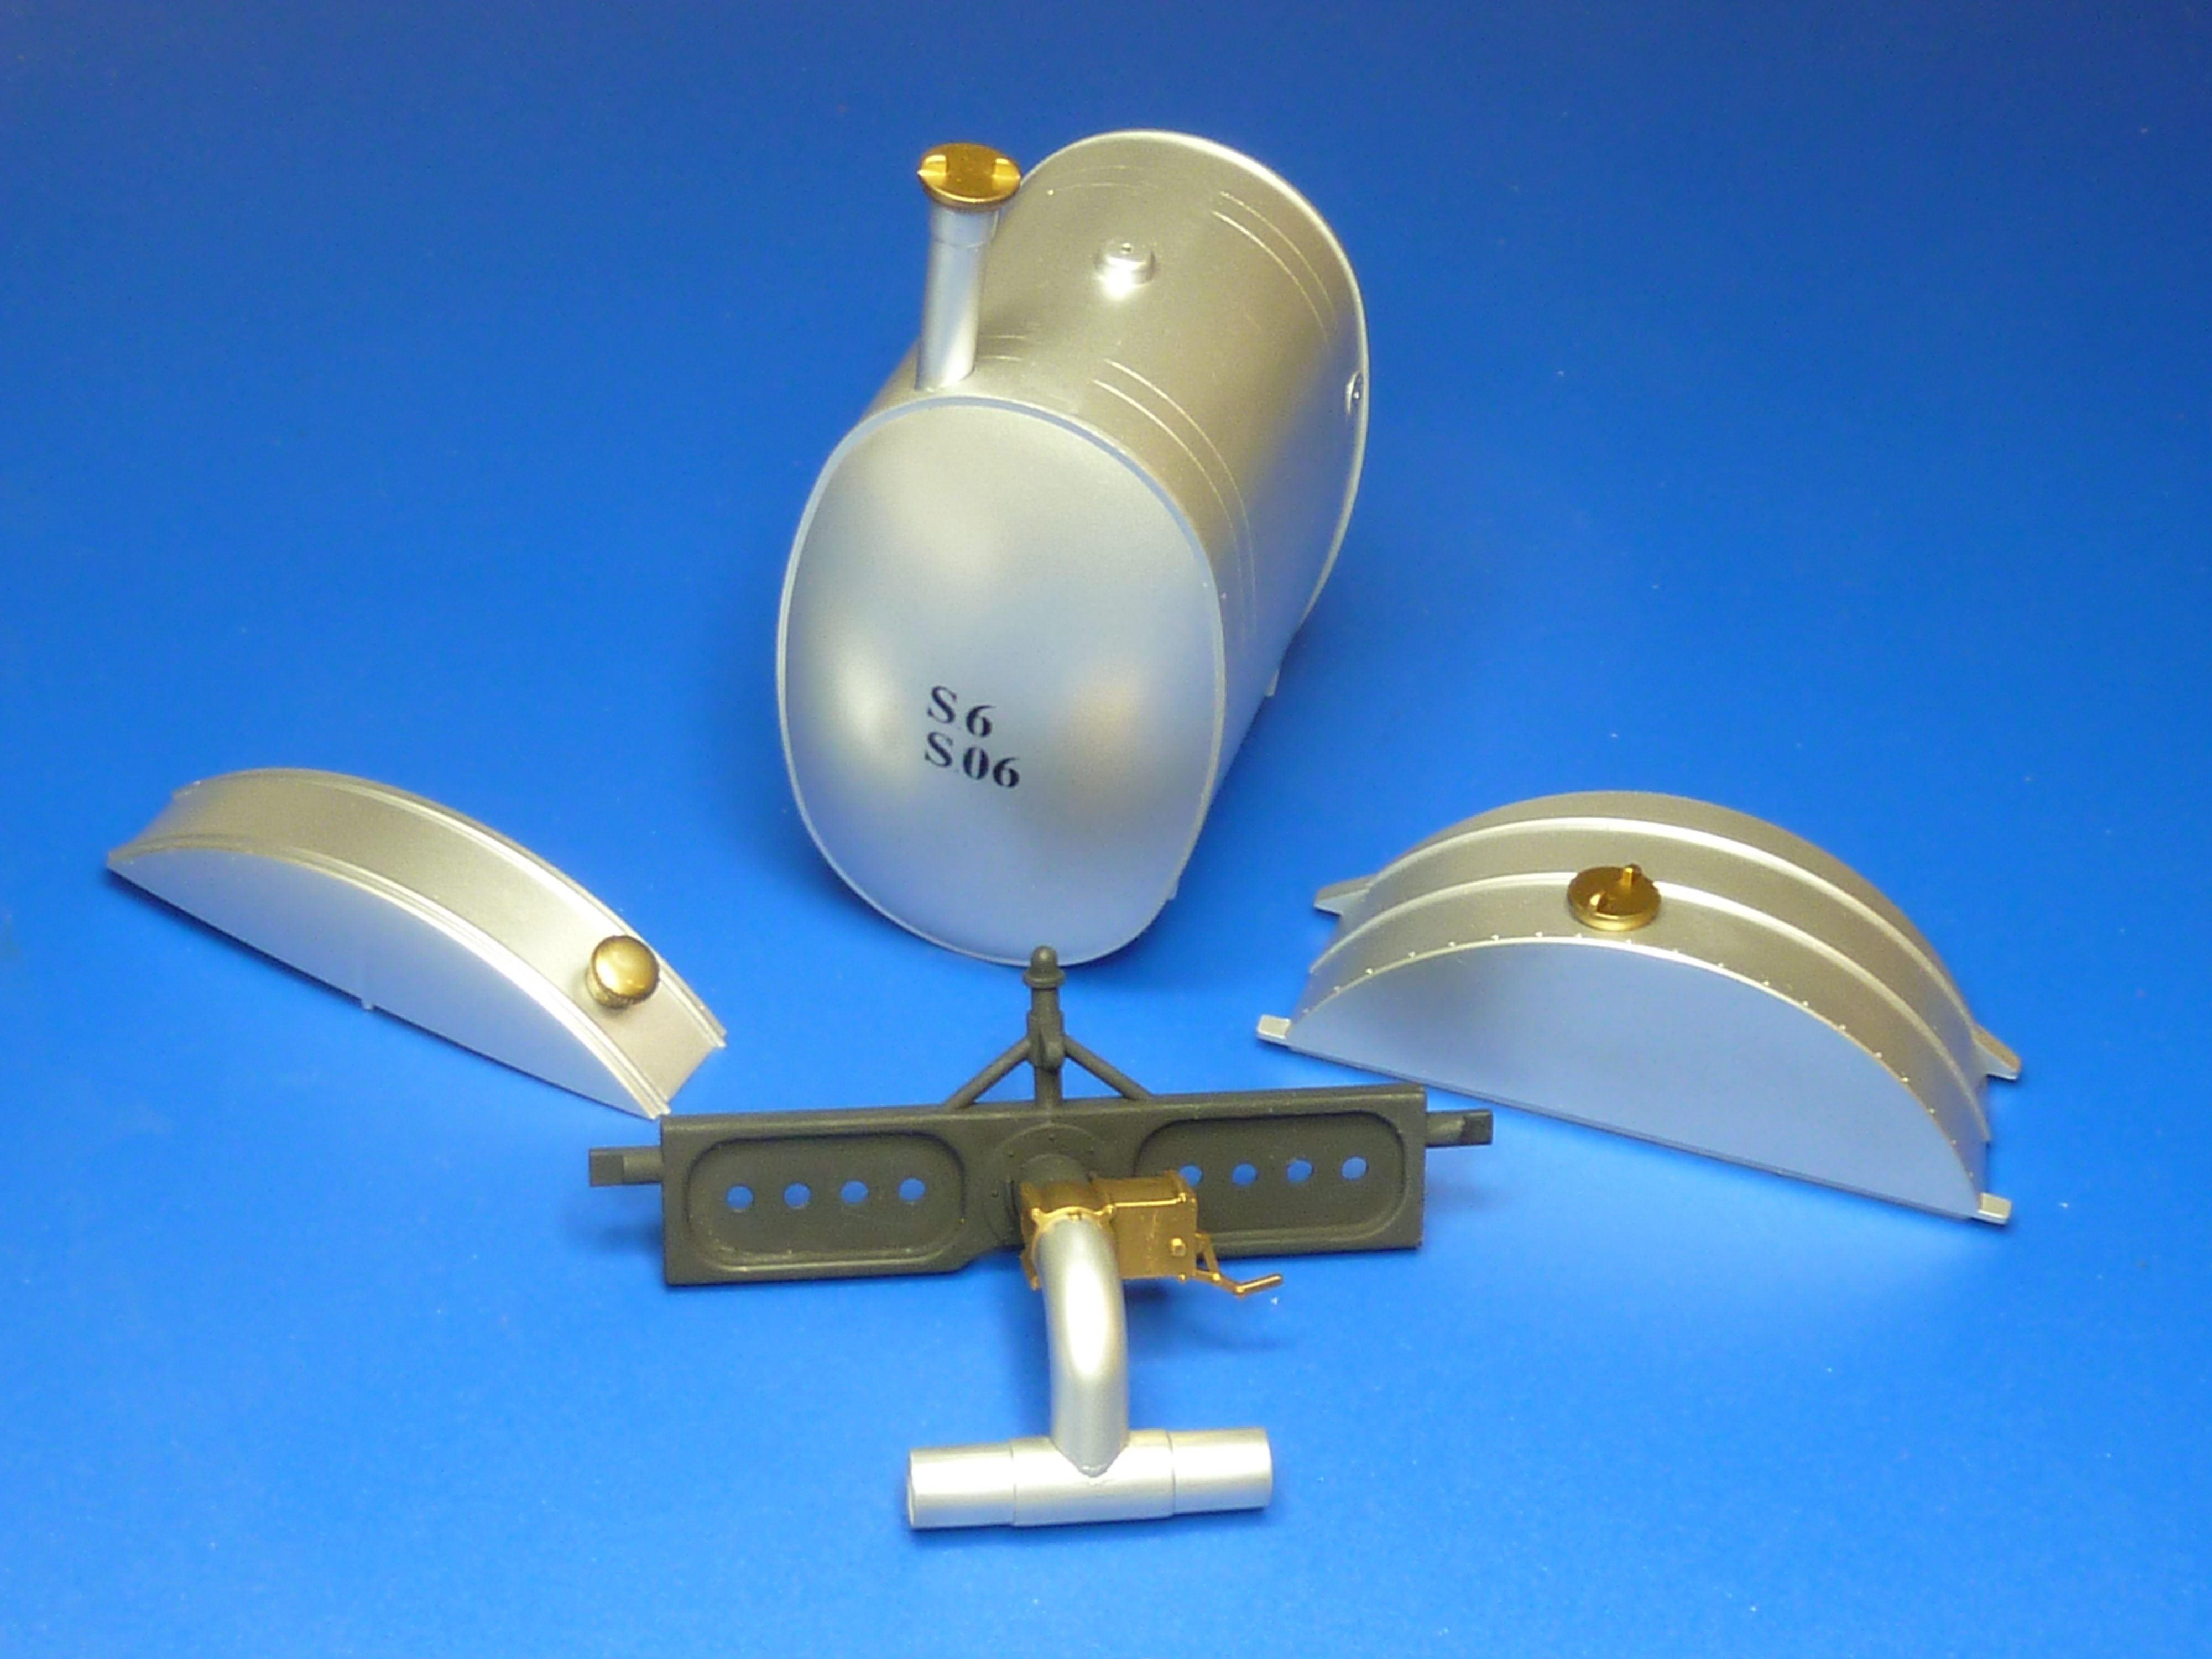
The Alclad lacquers were also used on the fuel tanks. Once dry they were given a coat of Klear to seal and protect them. Alclad was also used on the carburettor and its inlet manifold.
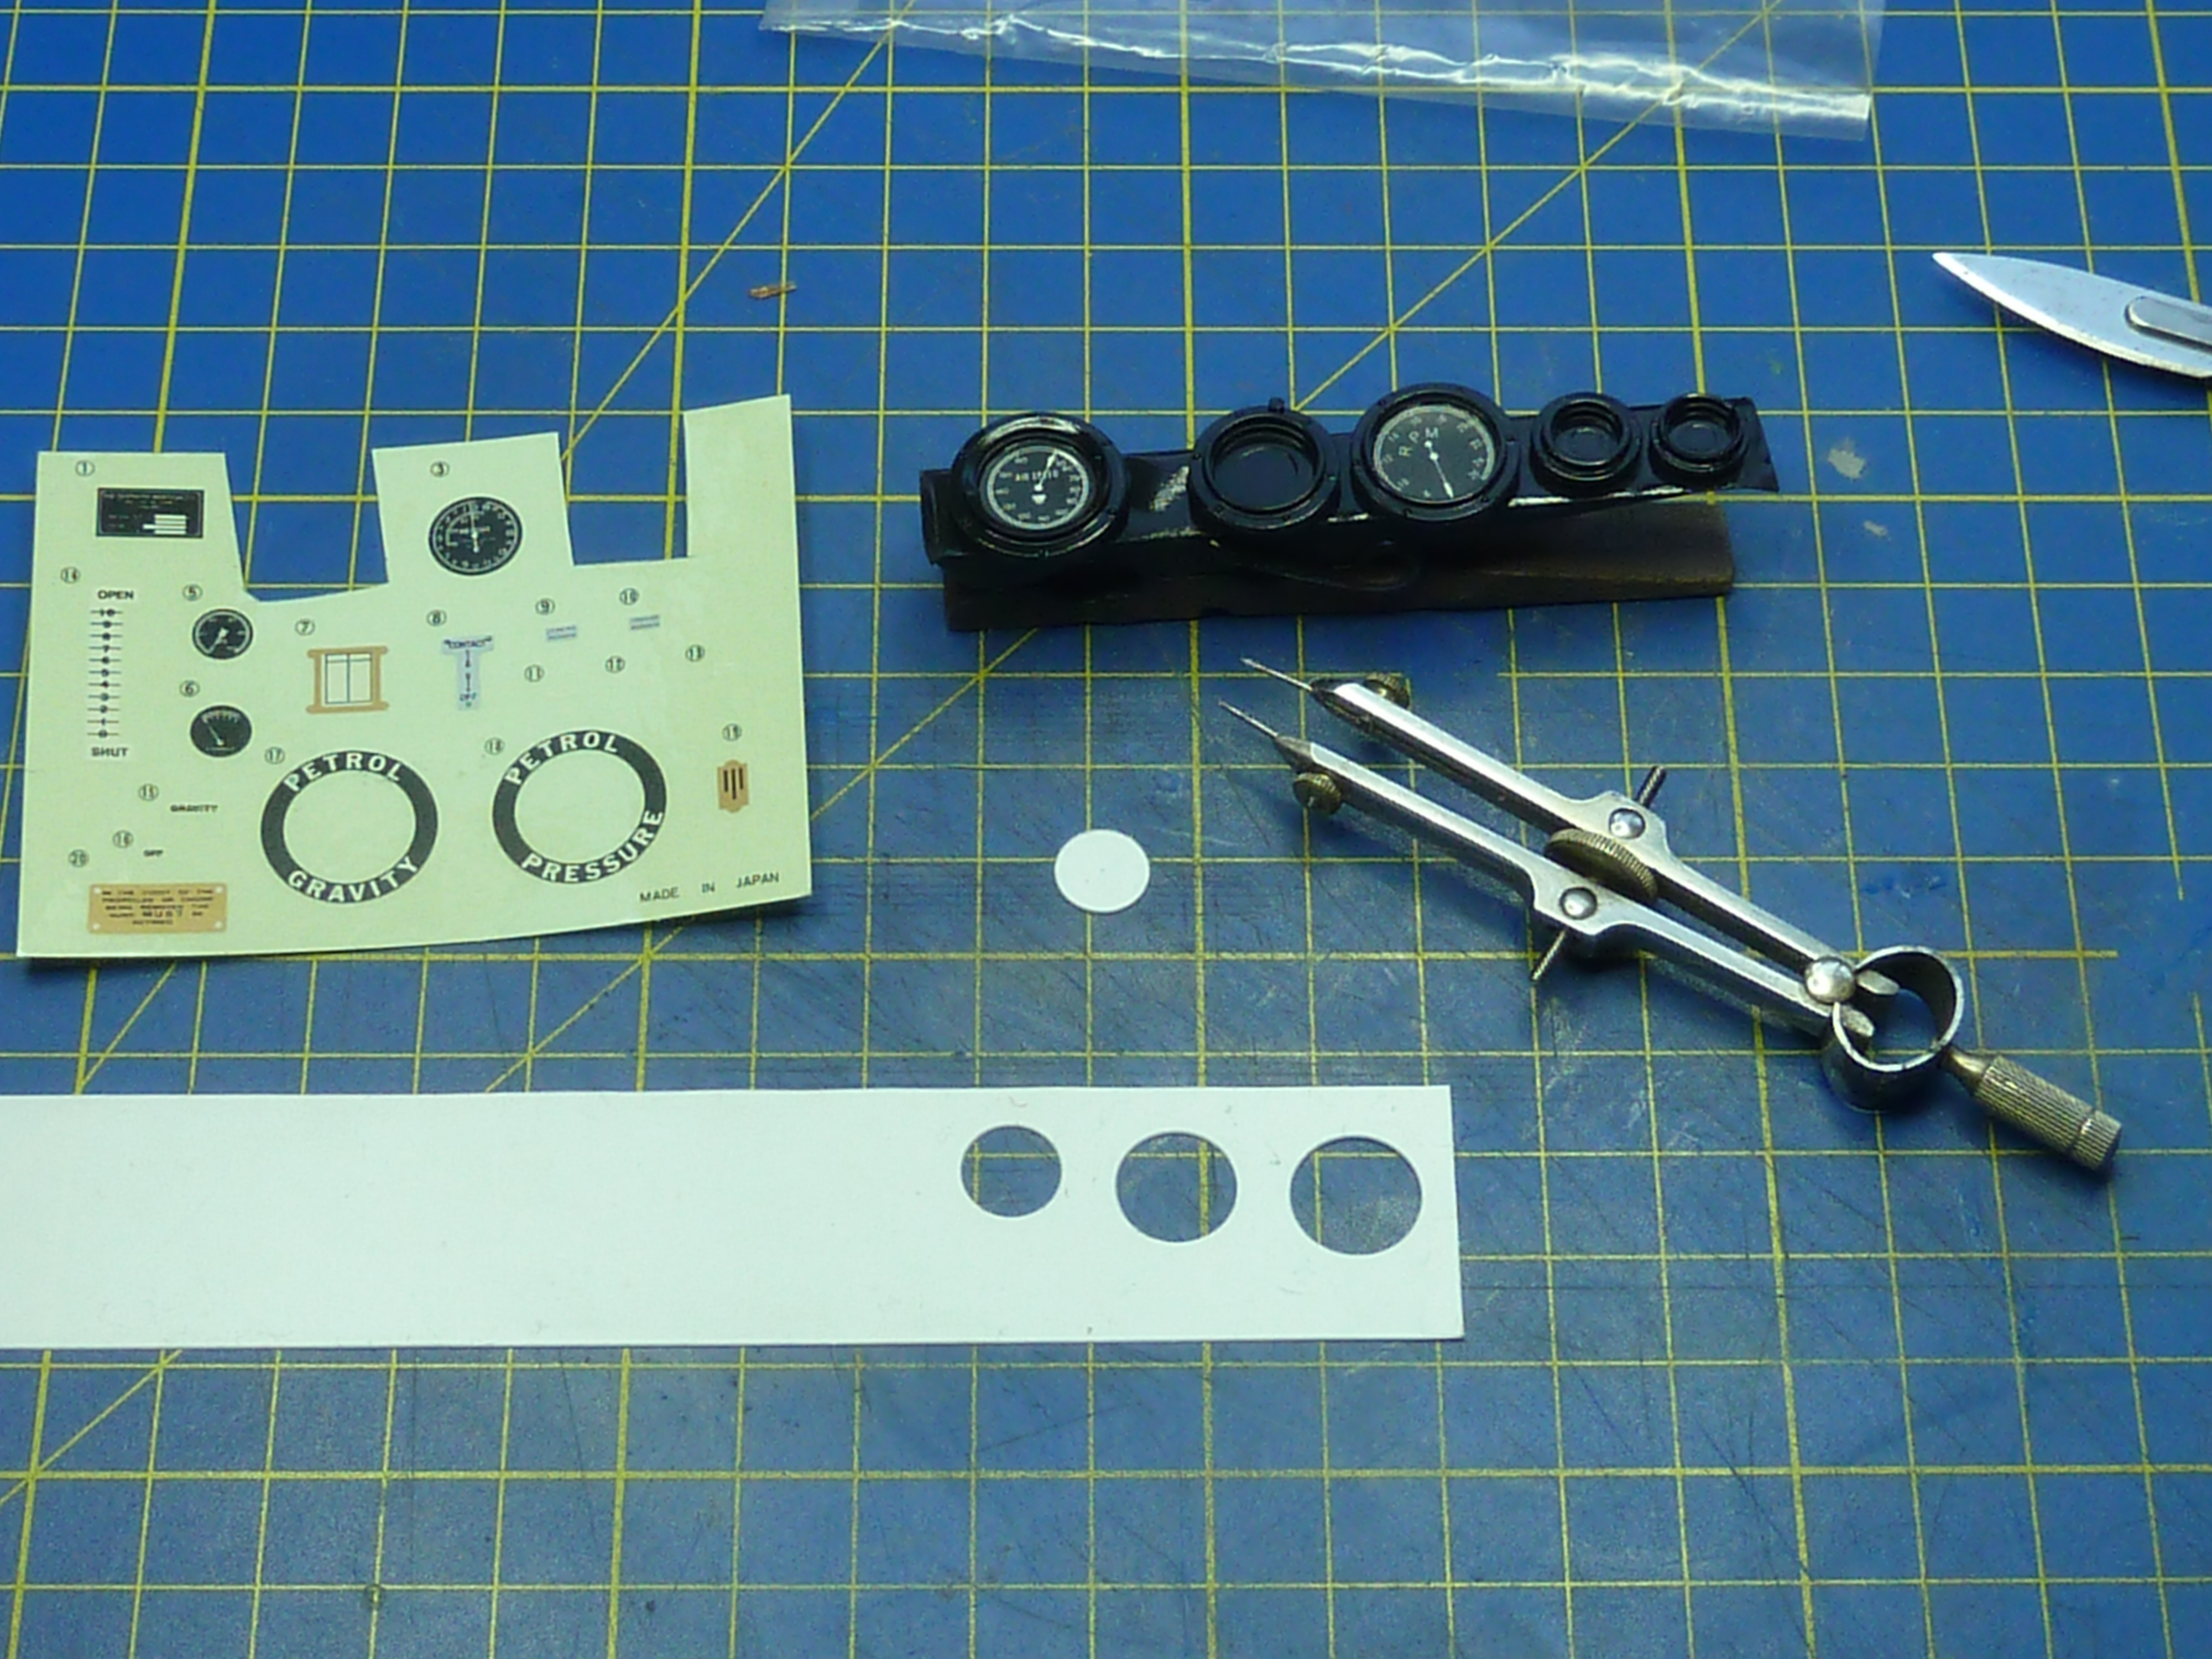
This time around I took the trouble to airbrush the dials on the instrument panel which gave a predictably better finish. I also mounted the dial stickers on plasticard prior to inserting them into the dials. This made the job much easier and also meant that the uneven back face in the dials didn’t distort the stickers. If you compare the two below you can see them improvements. I’ve always felt that my first panel lacked the ‘wow’ factor which the second has captured.


As before the main structure has been finished in Liberon’s ‘Golden Pine’ wood stain. However, this time I have airbrushed the stain and subsequent yacht varnish rather than hand painting which has improved the quality of the finish considerably.
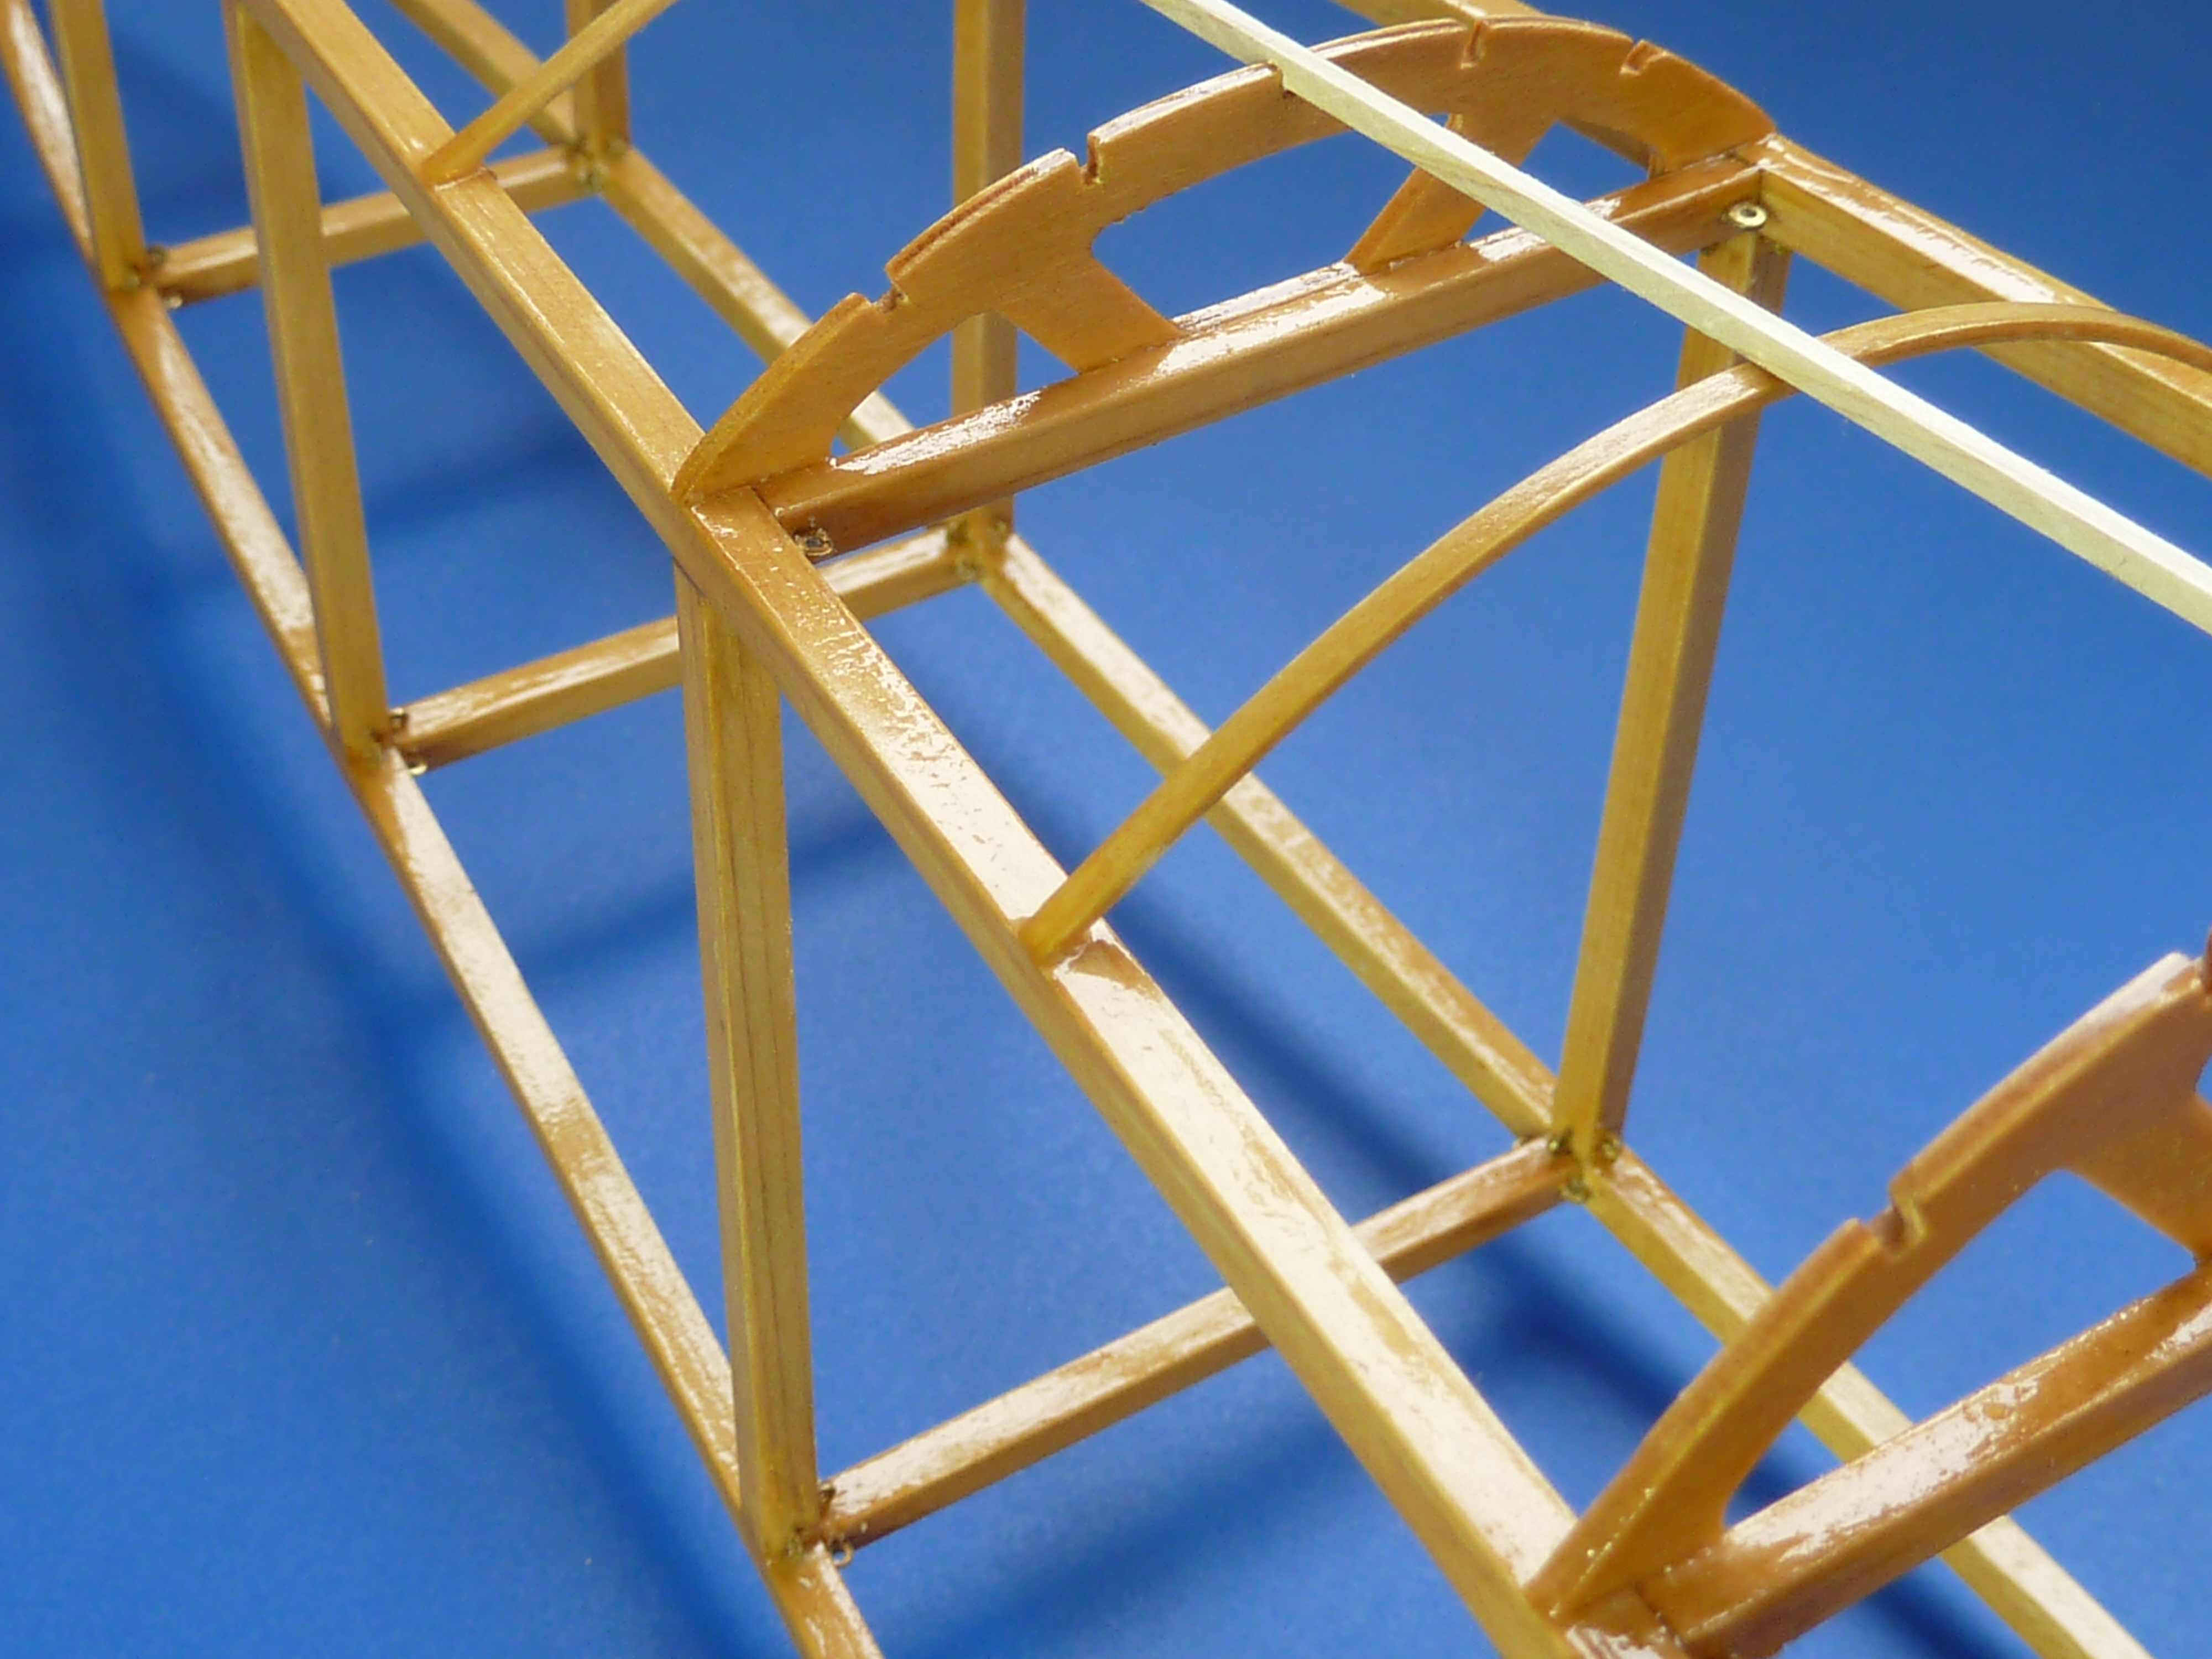
One detail improvement I have included in the second build is a number of smaller internal brackets in the fuselage. The kit includes most of the external ones but omits the internal ones for some reason. They aren’t hard to make but are a bit fiddly to fit. I used some miniature nuts and bolts made from resin to simulate the fixings.


On the second build I’ve also upgraded the mounting of the main fuel tank. The kit’s option is pretty simplistic and doesn’t incorporate the rigging lines or under tank support. So this time I have replaced the fabric tape of the kit with some plasticard strips which encircle the whole tank (the real bands are metal), and incorporated the tension brackets used to hold the bands closed. As part of the extra internal bracketry I’ve also included the mounting lugs for the additional rigging wires, the latter having not yet been fitted. In the photo above you can see the lugs on the forward (left) tank support cross member. The ones on the rear cross member weren’t in place at the time of the photo.
Here’s a picture the modified tank in-situ with all the brackets in place and painted. The rigging wires will be added once the cockpit internals have been completed.
Original build on the left. Current on the right.


The final modification I’ve made to the kit, this time around, concerns the top decking around the cockpit. The kits parts in the second model have some weird patterning on them which looks completely out of keeping with the scale of the model. As a result of this I decided to replace them entirely with some fresh ones made from 0.4 mm birch ply.
As I was making new I also took the opportunity to correct an error in the kit. The cockpit decking in the kit is split at the rear bulkhead of the cockpit, whereas in reality the split occurred at the rear cabane mounting points. This means there is an obvious join line on the kit not present on the real aircraft and also the angle which the decking approaches the rear of the cockpit opening is wrong.
To simplify the fitting of the decking I have made it all from a single piece this time around and have simulated the join at the cabane strut by scribing a faint line in the plywood. Below is a picture of the old and new parts as well as a picture of the Shuttleworth Trust’s Camel during its restoration.


That’s all for this update. I’ll be back to cover future changes to the original build process as it progresses.
For those not familiar with the build of the original model the build thread begins here.

It is always a pleasure to see your work. Thanks for sharing!
LikeLiked by 1 person
I’m always stunned at the detail of these kits. You just have an incredibly steady hand!
LikeLiked by 1 person
I’ve been doing it for a long time now. The thing that does surprise me is that I am still noticeably improving. With no extra effort this Camel seems to be turning out better than my previous one, though a lot of that may simply be due to familiarity.
I’d love to build a Sopwith Pup in the same scale to go with my Camel, but that will be a scratch build. However, I have just about all of the research information together now.
The Fokker has been hanging up in our lounge for quite a few months now and I still have no real affinity for it. It may well get replaced with a Pup one day.
LikeLike
Interesting that there’s a difference in the props in the two kits. Was there a difference in the two boxes or model serial number such that one was an earlier version and one later? Are you noticing any other differences? Or is it all just natural variation in the wood products?
LikeLike
I think it is mainly just natural variation in the wood. Some parts are better, some worse. The plywood cladding around the cockpit is horrid in this kit, whereas it was lovely in my first one.
The boxes are the same colour for what it is worth. Both green which I think is the original release. There are burgundy coloured boxes around, which I think is a later release of the same kit.
LikeLike
Very glad to see this new effort, and especially interesting to see your “round two” approach. Seeing the Shuttleworth photos, did you consider painting the brass rigging mounts black as they have?
All best regards,
Tony
LikeLike
If you look closely at the picture with the fuel tank mocked up in position you’ll see that they are now all painted black, as well as all the rigging lugs. It’s a tedious job and took a whole day, but I find that if you try and paint them before installation the surface gets damaged and the paint begins to flake off.
On the subject of fuel tanks. The Shuttleworth one is also black, which seem to have been the most common colour. However, I’ve also seen them in silver (natural tin?) and brass, and as the choice of silver allowed me to replicate the stencilling I’ve seen in one photo, that’s what I’ve gone for.
LikeLike
Hallo
I am in the possession of a Hasegawa Sopwith F1 Camel 1/8 scale model kit (not build). The box is compleet but the 4 ‘Actual size drawings’. These are missing but required for assembling the model. Are you, or is someone else in a position to supply (copies of) these drawings?
Hope hearing from you. Henk
LikeLike