
The tailplane of the Hasegawa kit is known to not be its strongest point. The structure has been simplified, I assume because of manufacturing limitations, to the point where it is quite compromised when compared to the real aircraft. That combined with my substitution of metal parts where the kit uses wood has meant that very little of the original kit has made it into the model. In fact the main spar and leading edge are all that’s left.
The first part of the build process was to manufacture the metal rear spar and the elevators. For some reason the kit elevators are separate items which operate individually, whereas the metal ones I’ve seen are mounted on a common hinge so that’s how I built it.
The actual assembly was made from brass tube, wire and some folded sheet for the elevator ribs. The hinges were made from tube of the same diameter as the main spars which was simply soldered in place. The elevator spar was brass tube mounted on a central brass rod which was a snug fit. As this all had to be threaded onto the hinges before it could be fixed, it is held together with simple CA glue. The elevator ribs were bent to shape using my Etchmate tool.
There’s really not much to say about the assembly other than that the parts were formed and laid out over the full size drawings to ensure the shape was correct. Formers based on various sized jars ‘borrowed’ from the food cupboards were employed to get even curves of the right radius. Joints were soldered.
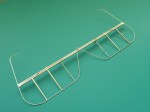


The tailplane itself went through a couple of iterations. I initially tried to modify the kit parts but this was not a success and they ended up being binned. The successful version was built up using the 1 x 2 mm strip supplied in the kit. Not least because I had loads spare as I wasn’t using on the wing leading edges. The design was simply guessed by copying pictures, though if you try it yourself, leave the little vertical rib components until after the rigging wires have been added as it makes positioning them easier.
Once built, the painting and covering followed the same procedure as that used on the mainplanes. The photos below were taken before the gloss black on the metal parts, and gloss varnish on the wood, had been applied.


And after painting and covering.


The fin and rudder were next…

Looks stunning so far. Can’t wait to see the end product.
LikeLiked by 1 person